Starting a new WordPress blog includes a lot of fun, experience, and enthusiasm. If you want to know the best way to start a blog, then read this awesome guide. After installing a new WordPress blog there are a few options that should be addressed for optimal performance. This is a short general WordPress guide for those new to WordPress blogging. If you haven’t configured the general options yet then start by reading this post: WordPress General Options Guide
After configuring the general options, next click the Users panel and the users assigned to the WordPress blog will be displayed.
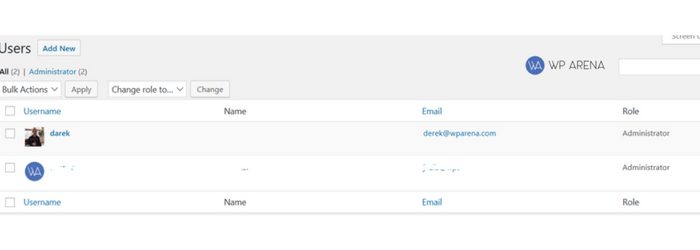
Click edit on the far right next to your account to open it. Hint hover your mouse over a name to see the “edit” button to click on. Add and update the information in your user profile or edit a user on your blog that you want to move to a new membership role such as admin or editor. You can also change your password here if you wish. At the very top of this panel is an option to “Use the visual editor when writing”. Checking this option will allow you to use a slimmed down version of a WYSIWYG write post editor. Unchecking it will show only a “code” editor when writing posts, with limited options for those not familiar with HTML code.
Click on the settings panel in the dashboard and then on the Writing subpanel. In the writing subpanel, you can the default link category for blog posts if you forget to select one when published a post. You can also select the default post format, I leave the default option selected on any blog I create.
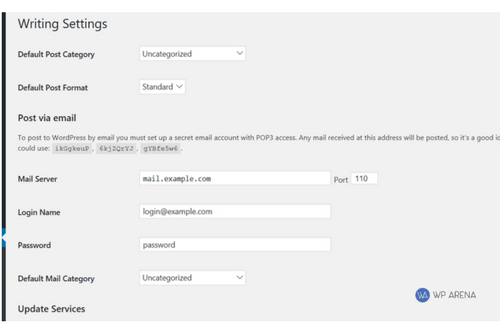
In addition to all this, you can set up an email account to post to your blog by email. The last option in the writing sub panel is Update Services. This is a list of blog services to notify when you publish a new post. I suggest and install the WordPress Ping Optimizer for this purpose. You can add some or all of the following list into this area or in the options for WordPress Ping Optimizer:
http://blogsearch.google.com/ping/RPC2
http://rpc.pingomatic.com/
http://technorati.com/
http://ping.feedburner.com/
http://blog.goo.ne.jp/XMLRPC
http://coreblog.org/ping/
http://ping.blo.gs/
http://rpc.weblogs.com/RPC2
http://bitacoras.net/ping
http://blogbot.dk/io/xml-rpc.php
http://www.blogoole.com/ping/
http://www.blogshares.com/rpc.php
http://www.blogsnow.com/ping/
http://www.blogstreet.com/xrbin/xmlrpc.cgi
http://bulkfeeds.net/rpc
http://ping.bitacoras.com
The Reading Panel
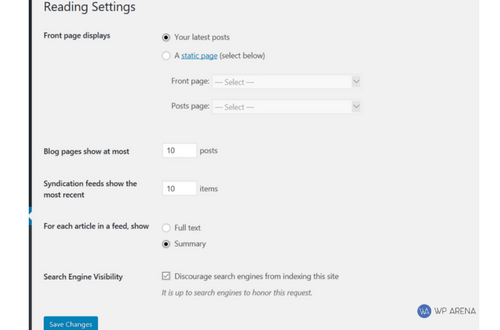
The next settings panel is to click on the Reading link. Clicking it will give you the option to use a static front page for your blog. This will show a page that you create instead of the regular blog loop. To learn how to properly use the static front page option check out this post: How To Use A Static Front Page With WordPress.
You can also specify how many posts to show on the main blog page, and if pulling content from a syndicated feed whether or not to show them as a full post or just a summary.
The Discussion Panel
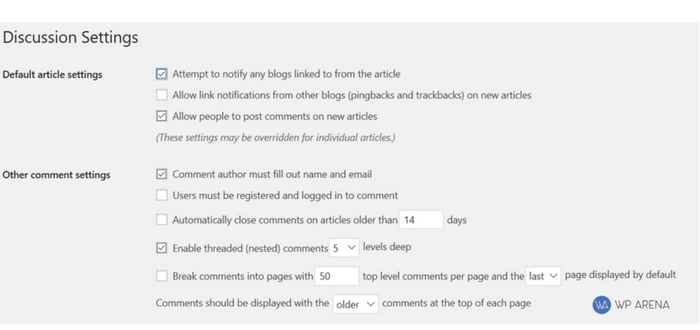
Next is the Discussion subpanel; here you can specify how to handle comments and incoming links (trackbacks). I suggest all options but two be checked in here. The only two to uncheck under Before a comment appears: should be An administrator must always approve the comment and Comment author must have a previously approved comment. This will allow people to comment easier. The remainder of this area is to blacklist nasty blog comment spammers. I suggest holding a comment if it has more than 2 links in it. And you can also blacklist certain spammers in this area if you wish but I have found either the Akismet or Spam Karma plugins to effectively stop most comment spam.
The permalinks Panel

The last option subpanel is Permalinks. This option will change the actual URL of your blog posts to one specified by you in this area. For more about permalinks, I have a guide posted here: WordPress Custom Permalink Structure
I hope you found this post useful and be sure to use the search function on the sidebar or read the WordPress Optimization Guide for more.


