


How would you react if you knew that you could design and style your theme without disturbing your parent theme? Excited hah…!!!
Here comes the story behind this statement, which you might think is a distracting point. But, yes you can create a child theme that won’t disrupt your main theme even after updates.
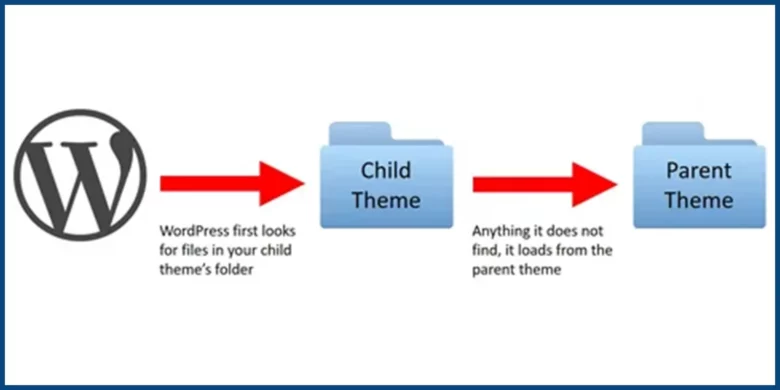
A WordPress child theme is a sub-theme that contains all the designs and features of a parent theme, which permits you to manage and customize the parent theme without directly modifying its code, such that all the changes remain preserved when the parent theme is updated.
It’s like a layer on top of the parent theme where you can make changes without affecting the original theme files.
What is a WordPress Child Theme?
Think of it as your personalized playground—safe from all the updates that wipe out all the changes in the main theme. This smart powerhouse lets you put your unique touches to increase your website’s functionality.
A WordPress child theme acts like a magical layer for your website. It serves to make tweaks and twists to it without bothering the parent theme. You do not need to do coding to your parent theme.
Methods Overview
When it comes to creating a child theme, you've got options. Here’s a quick look at three popular methods:
- Manual Method: The manual method is not a child’s play. This method is for those who are not afraid to get their hands dirty with code. It comprises manually setting up your child theme where you can create and edit files directly in your WordPress directory. You get more control over your theme.
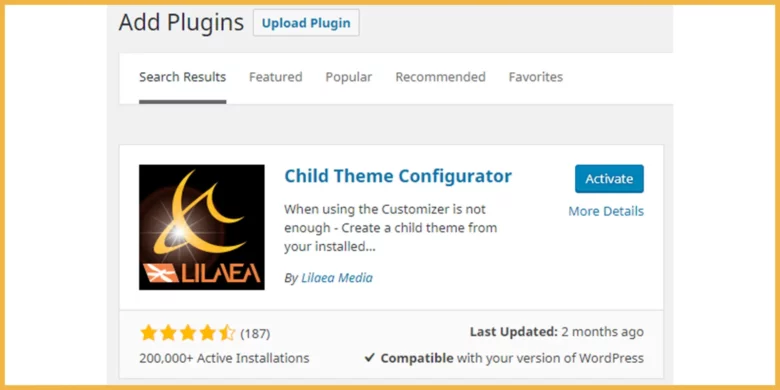
- Use of a Plugin: Not a fan of coding? No worries. Plugins like Child Theme Configurator make it smooth when this plugin manages all the setup with just a few clicks. It’s perfect for quick customization without coding.
- Theme Builder: Theme builders such as Elementor and WPBakery offer you flexibility and innovation in design. These tools permit you to do creative designing along with direct implementation of child themes in the framework. This method is ideal for those who are already using or plan to use these builders for their site design.
Why Should You Use a Child Theme?
You have now read the basics and core concepts of the child themes. Let’s investigate it further discussing its other aspects in detail.
Protect Customizations from Updates:
Child themes are like a safety net for your WordPress site. They keep all your custom changes—like tweaked designs or added features—safe and sound, even when the parent theme updates. No more stressing about losing your hard work every time there’s an upgrade!
Ease of Use
Child themes let you customize your WordPress site without touching the core theme files. They act like a safe playground for tweaks, so you can experiment freely without breaking your site. It’s simple, clean, and worry-free!
Safe Theme Customizations
Child themes are like a sandbox for your WordPress site—they let you test and experiment with designs, code, and features without risking the main theme. If something goes wrong, your original theme stays intact, so there’s no fear of breaking your live website. It’s the perfect way to play it safe while getting creative!
Pre-Requisites for Creating a WordPress Child Theme
You have started building a child theme, it’s good to have a few things in place. Don’t worry—it’s not rocket science, but having some basics ready will make the process much smoother. Here’s what you’ll need:
A Basic Grasp of WordPress
If you’ve ever installed a theme, added a plugin, or played around with the dashboard, you’re already on the right track. Knowing your way around WordPress will make the whole process feel less intimidating.
Access to Your Site’s Files
You’ll need to upload or edit some files, so make sure you have access to your site’s file manager (through FTP or cPanel) or the WordPress admin dashboard. This lets you create and manage your child theme without any hiccups.
Some CSS and PHP Knowledge (Optional)
If you want to use simple child themes, then you might not need to touch code. But if you want to tweak designs, add custom features, or change how templates work, a little CSS and PHP know-how will come in handy.
Creating a Child Theme Manually
There is a step-by-step guide to creating a child theme manually. Here you go:
Step 1: Create the Child Theme Folder
Go to your WordPress theme directory first. It is located in "wp-content/themes”. Once you’re there, create a new folder for your child's theme. Name it something clear and relevant, like “yourtheme-child” (replace “yourtheme” with the name of your parent theme). This folder will hold all the files for your child's theme, so keep the name simple and easy to remember.
Step 2: Create the Style Sheet (style.css)
Inside your child theme folder, create a “style.css” file. Add the required details at the top, like the theme name, template (parent theme folder name), and author. Here’s an example:
```css
/*
Theme Name: YourTheme Child
Template: yourtheme
Author: Your Name
*/
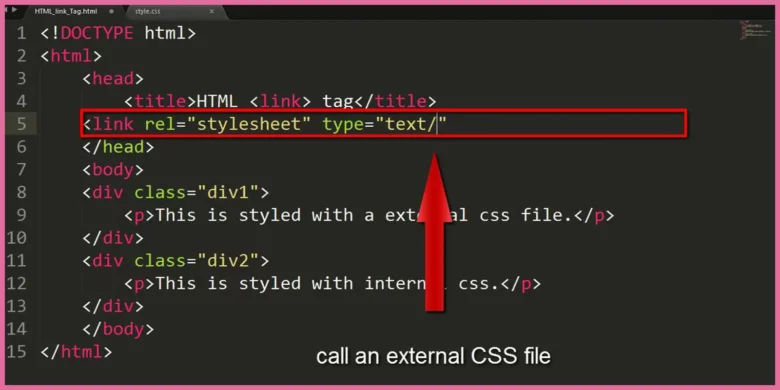
To load the parent theme’s styles, enqueue them in your child theme’s `functions.php` file.
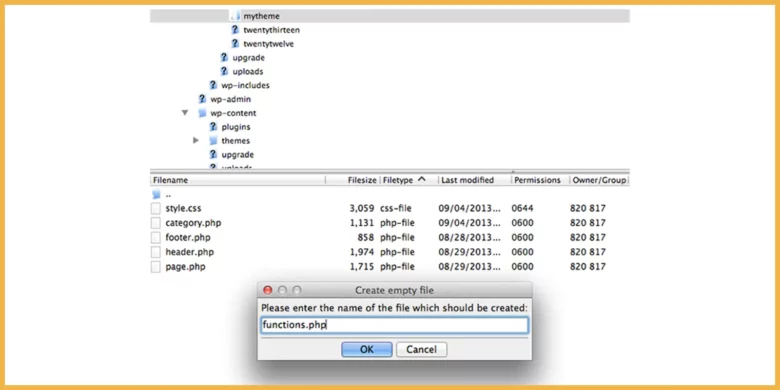
Step 3: Create the Functions File (functions.php)
Now, create a `functions.php` file in your child theme folder. This file plays a key role—it ensures your child theme loads the parent theme’s stylesheet. Without it, your child theme won’t look like the parent theme. Here’s the code you’ll need:
<?php
function enqueue_parent_styles() {
wp_enqueue_style('parent-style', get_template_directory_uri() . '/style.css');
}
add_action('wp_enqueue_scripts', 'enqueue_parent_styles');
?>
This snippet tells WordPress to grab the parent theme’s styles, so your child theme stays consistent with the original design while letting you add your custom styles.
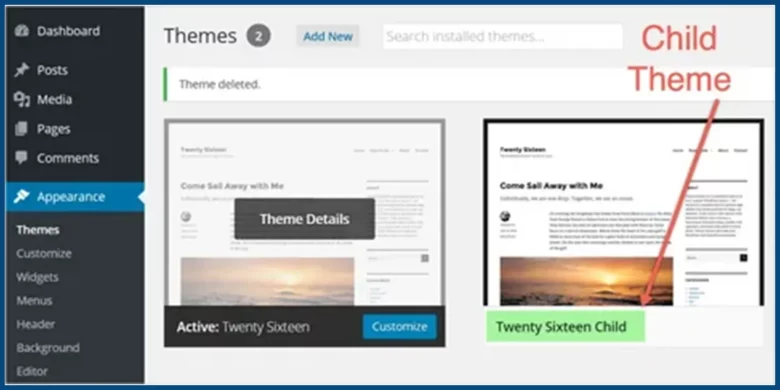
Step 4: Activate the Child Theme
The next step is to activate the child theme. To do this, go to Appearance > Themes on your dashboard and click “Activate.” The theme will be activated, and you can now customize it.

Step 5: Test and Customize
Testing is a must before starting or launching a website. Scroll through your web pages, jumping from one to another, and checking the smoothness and functionality of design and display. If everything goes right, you're good to go.
Now you have a free hand to customize your stylesheet and modify color, fonts, and layouts. You can also add custom CSS now.
Use of Plugin to Create a Child Theme
Plugins offer ease in complex tasks. Here is a breakdown of the steps to create a Child theme using a plugin:
Step 1: Install a Best Child Theme Plugin
- Select Plugin: Firstly, you must select Child Theme Configurator from the WordPress plugin directory.
- Go to Plugins: Then you go to your WordPress dashboard, search Plugins, and click on Add New.
- Search and Install: The next step is to type "Child Theme Configurator" in the search box, then click the Install button.
- Activate Plugin: Once installation is done, click the Activate icon to enable it on your site.
Step 2: Create a Child Theme Using the Plugin
- Open Plugin Settings: Open your plugin settings, locate Child Theme Configurator in your dashboard, and click it.
- Select Parent Theme: The second step is to pick the parent theme you want to customize from the list.
- Configure Options: Then you have to choose your priorities for how is the behavior of your child theme.
- Generate Child Theme: Click the Create button to create your child theme instantly.

Step 3: Activate the Child Theme
- Go to Themes: Now you have to go to Appearance in the dashboard and then go to Themes.
- Find Your Child Theme: Search for the child theme you have just created.
- Preview: Now hover over the theme and click 'Live Preview' to see it in action.
- Activate: Hit the Activate button to set your child theme live.
Use of a Theme Builder (e.g., Elementor or WPBakery)
Theme Builder is quite an easy approach to create a Child Theme. Here is a step-by-step guide to do it efficiently.
Step 1: Setting Up Your Theme Builder
- Pick Your Tool: You have to select from widely used builders like Elementor or WPBakery.
- Start Installation: Head towards Plugins > Add New in your WordPress dashboard.
- Install and Activate: Now click Install for the builder you want, then click Activate.
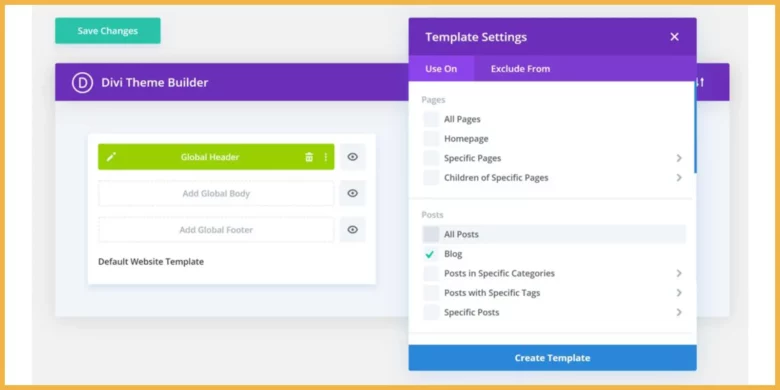
Step 2: Crafting a Child Theme with the Builder
- Access Builder Features: Firstly, go to the builder and search for features labelled as Theme Builder or Child Theme Creator.
- Follow Steps: The builder has its guide. It guides you through the child theme creation—just follow along.
- Design Freely: The next is the designing. Use the drag-and-drop interface to tweak layouts, headers, and footers without coding.
- Enjoy Creative Control: Bravo…!!! The builder handles the tech part, and now you need to focus on bringing your creative vision to life.

Which Method Should You Choose?
When it comes to creating a WordPress child theme, there are three main methods to pick from. Each has its strengths, so the best choice depends on your skills and what you’re looking to achieve. Here’s a quick breakdown to help you decide:
Manual Method
This is the go-to option if you’re comfortable with code or want full control over every detail. It’s great for developers or anyone who doesn’t mind getting their hands dirty with CSS, PHP, and file management.
Plugin Method
If you’re a beginner with poor knowledge or just want a quick, no-coding, using a plugin like Child Theme Configurator is your best bet. It manages all the technical stuff for you, so you can focus on customizing your site without any stress.
Theme Builder Method
If you have techi kind you love visual design tools and want advanced customization without dealing with any codes, builders like Elementor or WPBakery are perfect. They allow you to create and alter your child theme using drag-and-drop features, making the process smooth and functional.
Choose the method that fits your skill level and goals, and you’ll be on your way to a fully customized WordPress site!
- Forgetting to Add Parent Styles Properly: It happens, Sometimes the style of the parent theme doesn't look good because the link between child and parent themes wasn't established properly. You need to always check that your stylesheet is correctly enqueued to avoid a terrible look.
- Overriding Too Many Templates: You are curious and tempted to customize everything, but changing and switching too many template files can lead to problems. You need to stick to a specific template to avoid complications that could make your site unstable.
- Not Testing the Child Theme: Testing is an important phase in creating something. Always run a trial on a test site before you make your child theme live. This step helps you track errors and keeps everything functional as expected without disturbing your live site.
- Ignoring Compatibility with Future Updates: You have to keep an eye on how updates will interact with your changes. Make sure your changes are compatible with upcoming WordPress and theme updates to avoid a broken site after the update.
Advanced Customizations for Your Child Theme
Creating Template Modifications
To customize components of your website, such as header or footer, replicate header. php or footer. php file from your parent theme to your child theme directory. Then, make your edits there. That way, your changes will be preserved when the parent theme is updated.
Adding Custom Functions
You can add your functions to the functions. php file in your child theme. This file serves as a stronghold to implement the new features or change the existing functionalities.
Custom CSS & JavaScript:
You can spice up your site by adding custom CSS or JavaScript. Simply link these files in your child theme’s functions.php or directly insert them in the template files where needed, but make sure that they load correctly and override the styles and design of the parent theme.
Use Hooks and Filters:
You need to get familiar with WordPress hooks and filters to alter your site’s behavior without changing core files. Hooks permit you to 'hook into' parts of the WordPress process, while filters allow you to modify data before it is shown to the user or used by the database.
Conclusion
Creating a WordPress child theme allows you to change your site without risking the original settings or features. This process keeps your custom styles and functions safe, even when the main theme updates. Whether you prefer coding, allergic to coding and using a plugin, or use a theme builder for more visually appealing designs, there’s a method to suit your skills and needs. Each offers completely different levels of control and customization, so you can maintain a unique site without the hassle. You do not need to forget to test your child's theme on a test site first to see if everything works smoothly before going live. This way, you avoid common pitfalls like incompatible updates or unstable changes, making your site both attractive and reliable.


Responses (1 )