

WordPress makes it easy to build a website and publish blog posts regularly. However, in some cases, there's a need to break up the page title or blog post into several sections.
A good title should easily attract the attention of its readers. WordPress users can create a title as one header line. However, the default settings do not give you the option to split the title or posts into several pages. You might be looking for a unique title or something that brings more attention to its reader.
Still, you have to know that a long title might affect your website SEO. Today, we are going to discuss a few ways on how to break up the WordPress page titles and posts.
How to Split Your WordPress Title?
Breaking up your WordPress title gives you a chance to make your blog posts different and more unique when compared to other bloggers. With the exception of concise and short titles, most of them can be broken up with ease, making them more appealing and increasing the chances of drawing attention to your website. Likewise, you can remove page titles in WordPress to improve the aesthetics or functionality of your blog. If you want to break up your WordPress titles, one of the best ways to do it is to make use of plugins. Page Title Splitter is one of such tools that can help you do it more easily and quickly, packing a lot of useful features alongside.Installing Page Title Splitter Plugin
Here's how to install and activate the Page Title Splitter plugin:- Once you’re in your WordPress dashboard, click on Plugins and choose the Add New option.

- Search for Page Title Splitter. It will display you a number of relevant plugins.

- Click on Install Now. Just as with any other plugin, you need to activate it first before you can begin using it.
How to Use Page Title Splitter Plugin?
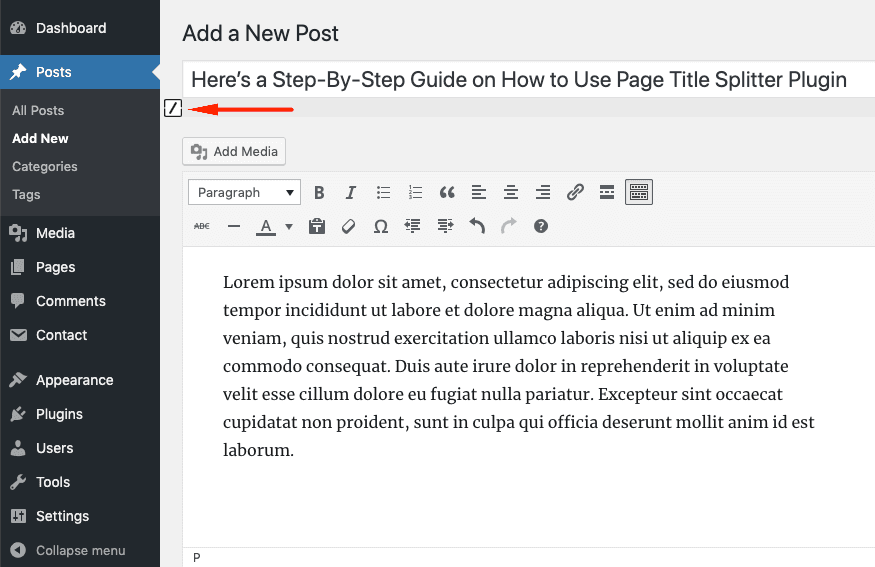
Here’s a step-by-step guide on how to use Page Title Splitter plugin:- Choose a blog post you want to edit or create a new one. You should now see a small square next to the title section.

- Wherever you want to break the title line, press the small square and click the part where you want to place a split.

- If you to move the split to a different place, simply press the triangle below the dotted line (selecting it) and click any other part of your title.
- Similarly, by selecting the split and pressing the red square with an ex symbol (X), you can remove it entirely.
- Click the Preview button to check whether you’ve done everything correctly and see your final results.
Adding a Subtitle vs. Splitting the Title
Most WordPress users confuse one word for the other when using these two terms. So, what's the difference between them? When you’re splitting a post title, you are breaking it into a number of lines or rows. Additionally, there is no application of style or format. On the other hand, by adding a subtitle you can include two or more headings to your WordPress page or post. For example, you might provide a short rundown about the subject before the reader delves into the core part of your article.How to Split WordPress Posts Into Separate Pages?
It’s also possible to split your posts into several pages. You may have already published a lengthy blog on your WordPress website, but would like to make it more digestible for your readers. You can easily do so by breaking the post into separate smaller sections Moreover, every time a reader clicks on the Next Page button, you get an increase in the number of viewed pages per visit. You can find numerous plugin options for separating WordPress posts into separate pages. In this article, you’ll learn how to use WP-PageNavi and WP-Paginate.WP-PageNavi
WP-PageNavi works with most WordPress themes and includes a variety of flexible control options. This plugin allows users to manage the chronological order of their blog posts and page numbers. Here’s how you can split WordPress post using WP-PageNavi:- Install and activate WP-PageNavi from the Plugins menu.
- Navigate to your WordPress Dashboard, then go to Settings -> PageNavi.
- Tweak around Page Navigation Text and Page Navigation Options to your liking. Once you’re done, click Save Changes.
- Refresh your WordPress website to preview the changes. You’ll see your new pagination setup on your homepage.
 If the plugin doesn’t work seem to work, you might need to tweak your theme code:
 - Head to your WordPress Dashboard. Go to Appearance -> Editor.
- Select the Main Index Template (index.php) under the Theme Files section.

- Locate this PHP code <?php twentythirteen_paging_nav(); ?> and replace with <?php wp_pagenavi(); ?>.

- Click Update File once you’re done.
WP-Pagination
WP-Paginate is another great plugin to split your posts into several pages. It works well with a gallery-style numbering system. However, for such cases where an article has less than two pages, you may not find this plugin useful. Let’s get to know how to use WP-Paginate:- Once you’ve installed and activated WP-Paginate, go to Settings -> WP-Paginate.
- Scroll down to the Location & Position section in the Settings tab, and select the page where you want to display the pagination.

- Click the drop-down menu to choose the pagination position on your page. Then, check the Hide Standard Pagination option to hide the default WordPress pagination.

- Now, head to the Appearance section and pick your preferred font and button style.
- You may leave other settings as they are and hit Save Changes. Here’s how the pagination will look like on your site’s pages.


Responses (2 )