WordPress is one of the best and very popular blogging platforms which is not only free but also an open source project.
On the other hand, WPMU (WordPress Multi-user (Old name) now WordPress Multisite ) is another version of WordPress which uses the core WP with some modifications and convert any single user WordPress blog into a multi-user/multi-site blogging platform.

It is most famously used for WordPress.com where it serves tens of millions of hits on millions of blogs each day. Many WordPress bloggers are interested in using WordPress Multisite. Fortunately, It’s really easy and possible to convert your simple WordPress install into a Multisite Network.
If you want to convert your WordPress blog into WordPress MU, Then you must follow these steps:
1. Disable comments on your WordPress installed Blog. So no data arrives during the migration process.
2. In admin panel, Under Tools, Select Export and save Your xml file which contains all your WordPress blog data
3. Create a new folder, directory and install fresh WordPress MU with New database or install it on a different blog. Keep in mind all installation should be on the same server so that file could move quickly.
4. Adjust PHP setting according to your file size and sure it allow file upload, or in case If your file is too large, break it into smaller pieces. Now start to import you saved file as go to Tools in admin panel and Click Import, select option WordPress. Don’t forget to select the Check box to import attachments as well.
5. Confirm that your data and Photos has been migrated properly, All the images will be stored in folders under wp-content/blogs.dir/. In this directory, the numbers represent the blog ID, so the first blog installed will be the main blog and its ID’s number will be 1.
6. Confirm your Permalink structure as your requirement, for detail info check out Using Permalinks. This setting is very important in WordPress MU.
To change Permalink Structure, in Admin Panel Under Setting Select Permalinks , never forget to change the permission of .htaccess file to 777.
7. Now most important part, before downloading your “wp-content” folder, backup up your WordPress blog’s files and database so in case of any emergency you can roll back. Download wp-content folder.
8. Delete all files from your WordPress blog and Move or copy all WordPress MU files and folder from Temporary location to your domain space.
9. Upload your theme to wp-content/themes folder and plugins to wp-content/plugins.
10. Correct your Current URLs for WordPress MU under MySQL and you can do that via MySQL command line over SSH or via phpMyAdmin as follow:
a. Do Execute query: UPDATE wp_site SET domain=’muqadar.com’ WHERE id=1;
(where muqadar.com= you own domain name)
b. Do Execute query: UPDATE wp_blogs SET domain=’muqadar.com’ WHERE

blog_id=1;
c. Do Execute query: UPDATE wp_1_options SET option_value=’http://muqadar.com’

WHERE option_name in(‘siteurl’,’home’);
11. Check your w-config.php and update the defined constant DOMAIN_CURRENT_SITE if this is not set according to for your current domain.
12. Login to admin panel using same User Name and Password as you were used for WordPress blog.
13. Regenerate your Permalinks for WordPress MU. Go to Permalinks under Settings and change your structure as you did in Step# 6. Before pressing the Update button, never forget to change the permission of .htaccess file to 777.
14. To make themes available in “Appearance”, First you have to enable installed, Under Site Admin select “Themes” and enable the theme which you want to apply on your WordPress MU.
15. Now enabled themes would be available under “Appearance”, Activate the theme for your blog as you would normally do to activate themes in WordPress.
16. You have to activate all required plugins, Go to “Installed” under “Plugins” and activate your plugins.
Only the Admin has the right to access Plugins menu. Plugins Menu can be activated for a single blog and users under Options in Site Admin.
17. To reflect your Preference, you have to update all options throughout WordPress MU.
Now your WordPress blog is transferred to WordPress MU, When you get a login, you will see resemblance as you do in WordPress Admin, but it has fundamental differences.
One of the significant difference you can see the “Site Admin” on top of the left side navigation pane.
The Site Admin panel has 6 main additional Admin Panels and few more panels according to your installed plugins as follow:

1. Admin panel
You can search by users or by blogs as well as create a new blog or a new user.
2. Blogs panel
It contains a list of all blogs in WordPress MU, also you can create a new blog. This panel shows useful information about existing blogs, such as Blog ID, Assigned users and when blog was updated.
When you take you cursor on the blog, you will see following options:
Edit | Backend | Deactivate | Archive | Spam | Delete | Visit
3. Users panel
This Users panel is not same as Users of “Authors & Users” under Users. This Users Panel is used for modifying and assigning users in the entire WordPress MU system to specific blogs.
Keep in mind that spaces between user name are not allowed here.
4. Themes panel
This panel is used for making WordPress themes available to individual blogs and to your main Blog. Themes that are not enabled in this panel are not available, even to administrators under Appearance.
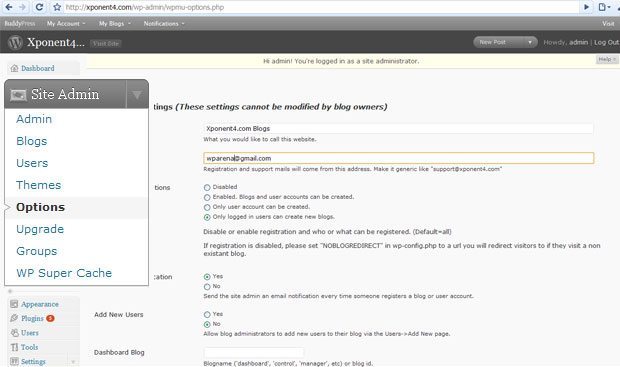
5. Options panel
The most important site configuration panel in all of WordPress MU. For tweaking and configuration follow the following table.
Your WordPress MU Configuration Options |
|
|---|---|
Option |
Description |
| Site Name | What you would like to call this website. You select it during setup phase |
| Site Admin E-mail | All administrative e-mail messages will be set to and from. It should be valid email. |
| Allow New Registrations | Allows new users to register blogs, just usernames, and so on. Note: Never forget to disable spam accounts that will inevitably sign up. |
| Registration Notification | This will notify Admin’s Email when any new registrations occur. |
| Add New Users | Allows blog administrators to create new user accounts for their blogs. |
| Dashboard Blog | Blog name (subdomain or folder) or blog ID that will be default blog for new user registrations. If you left it blank, the main blog is used. |
| Dashboard User Default Role | The default role for new users on the Dashboard blog. This should probably be ‘Subscriber’ or maybe ‘Contributor’. |
| Banned Names | Users are not allowed to register these blogs. Separate names by spaces. You can banned following names: www webroot admin main invite administrator members register activate search blog blogs forums groups activity. |
| Limited E-mail Registration | If you want to limit blog registrations to certain domains. One domain per line. |
| Banned E-mail Domains | If you want to ban certain email domains from blog registrations. One domain per line. |
| Welcome E-mail | The welcome email template sent to new blog owners. |
| First Post | First post on a new blog Creation. |
| First Page | First page on a new blog. |
| First Comment | First comment on a new blog. |
| First Comment Author | Author of first comment on a new blog. |
| First Comment URL | URL on first comment on a new blog. |
| Upload Media Button | The media upload buttons to display on the “Write Post” page. Make sure you update the “Upload File Types” below as well. |
| Blog upload space check | By default there is a limit on the total size of files uploaded but it can be disabled here. (By default, this is 10MB.) |
| Upload File Types | List of extensions that WordPress MU will allow to be uploaded. |
| Max upload file | Default 1500 KB |
| Admin Notices Feed | Display the latest post from this RSS or Atom feed on all blog dashboards. Leave blank to disable. A good one to use would be the feed from your main blog: https://wparena.com/feed/. |
| Site Admins | These users may login to the main blog and administer the site. Space separated list of usernames. |
| Menus | Places check marks next to the menu items you want blog administrators to have access to. |
| Plugins | Places check marks next to the Plugins menu if you want blog administrators to have access to. |
6. Upgrade panel
You can upgrade all the blogs on your site through this page. It works by calling the upgrade script of each blog automatically. Hit the link below to upgrade.


