Finally! You’ve got a brand new blog set up on your chosen domain, your hosting account is in order, and you’ve just published your first words on the world wide web. Now it’s time to make your mark. Your website isn’t just a platform for your writing. The design of your site frames the experience that people have when they read your posts. It’s important that your brand and personality shine through in each element of each page. With a fully personalized website, visitors are more likely to remember their visit, and it will help you differentiate yourself from the intense competition online. If you want to stand out from the crowd and create a strong personal brand with your website, get started with these seven steps for personalizing your blog.
Use your real name
Do you remember choosing a username for your WordPress site? The initial site creation process is often a blur of form submissions and emails, and somehow your name ended displaying as “admin” when you published your first post. The good news is that even though you can’t change your username in WordPress, you can change how your name is displayed on the site.
How to change your display name

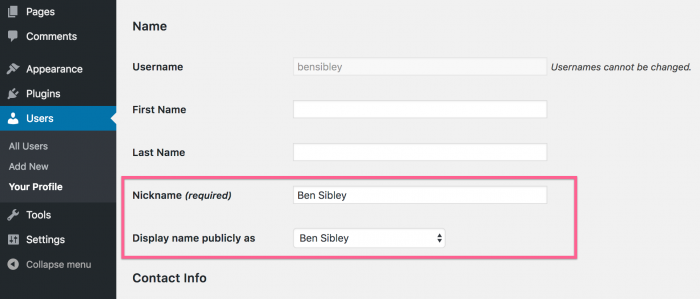
In your WordPress admin menu, navigate to Users > Your Profile. There you will find the Name section. IMG: change-display-name.png You can set a first name and last name if you’d like, but you’re looking for the Nickname field. Enter anything you want here and it will become an option in the display name selector. Once you’ve selected a new name to display publicly and saved your settings, your username will be replaced everywhere it appears on your site.
Add an avatar
Depending on the theme you’ve chosen, you may see an avatar displayed along with your name for each post. Your avatar is also likely to display in the comments section whenever you reply to one of your readers. Most WordPress themes will integrate with Gravatar for post and comment avatars.
How to use Gravatar
![]()
If you’re not familiar with Gravatar, it’s an awesome product by Automattic (the makers behind WordPress) that connects avatars with email addresses. IMG: gravatar.png You can create a free Gravatar account and upload an image to associate with your email address. Then whenever you use your email address on any site that integrates with Gravatar, your avatar will automatically appear. It becomes really convenient once you create your account. A lot of readers who comment on your blog will be using Gravatar as well, and it’s nice to have their avatars show up instead of some kind of placeholder.
What if I don’t want to use Gravatar?
For anyone not interested in using Gravatar, there are other options. WP User Avatar is the most reliable and well-designed plugin for adding custom avatars. This plugin allows you to upload and crop a custom avatar image. It won’t affect non-logged in visitors who comment on your posts, but it will allow you to choose the image that appears when you publish posts and leave comments on your site. The WP User Avatar plugin is compatible with most themes and works well with many WordPress themes.
Add an “author box” after each post
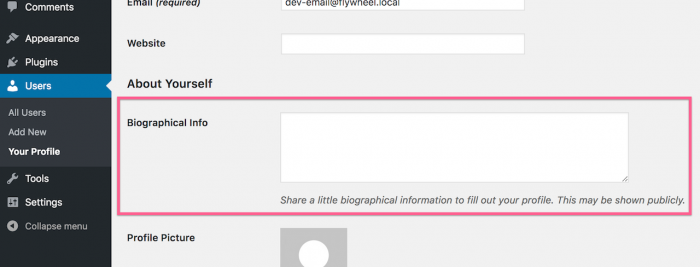
Adding an “author box” after each post is an excellent way to further build on your personal brand. You can include an avatar (using the last step), your name, and a quick bio about what you do and who you are. Some author boxes will also allow you to add your social profiles so readers can connect with you. If your theme already includes this feature, it will likely grab your bio from the Biographical Info text field in your user profile. IMG: user-bio.png Otherwise, the Simple Author Box plugin is an excellent option. It provides an easy and customizable way to include an author box after every post on your site.
Writing a great bio

When writing your bio, keep it short and to-the-point. One to two sentences work best. In addition to sharing some info about yourself, you should also include a call-to-action. Invite readers to check out a project you’re working on or download some kind of free product you offer. This will help each post you write deliver on your business goals.
Add an About Me widget

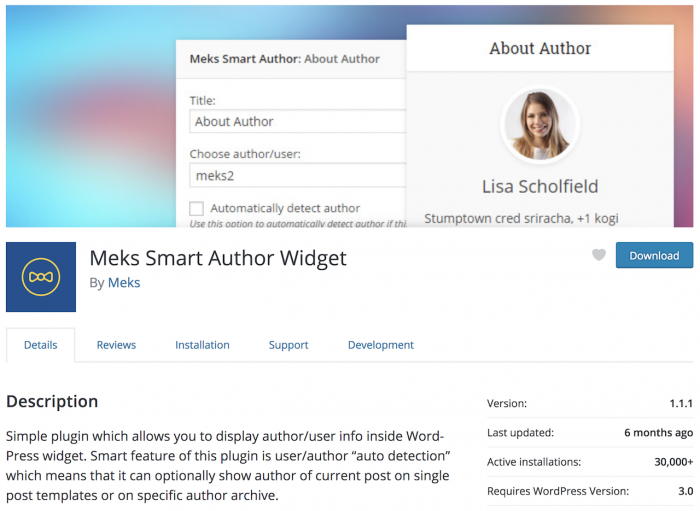
Does your blog have a sidebar? The sidebar is one of the best places to include a little more info about yourself and create a more personal vibe. You can always use a default widget like the Image or Custom HTML widgets, but the Smart Author Widget plugin will probably work best. IMG: smart-author-widget.png This plugin lets you create exactly the type of widget you’d expect for an “about me” section in a sidebar. It can display an avatar, your name, bio, and a link to all of your latest posts. As for the “smart” part of this widget, that comes from its ability to automatically display the author info for the post currently viewed. It’s a pretty cool feature for a multi-author blog or blog that often accepts guest posts.
Publish an About page
Regardless of what niche you’re in, the About page will be one of your most visited pages. Writing a powerful about page will help visitors connect with you and understand your mission. It’s a great time to focus on your values and pitch yourself as a blogger your visitors will want to support. You don’t need any tools or special templates or plugins for this. Pick a story about yourself you want to share and a few reasons why you started your blog in the first place and use them to craft an awesome about page.
Add your social profiles
![]()
This is another feature you can expect your theme to include. However, you might want to include your social profiles a few times on your site. Check out the awesome Simple Social Icons widget for adding additional social profile links on your site. IMG: simple-social-icons.png The size and color of the icons are customizable which makes it easy to get them to match your site. Your theme likely has a few widget areas you can include this widget in, and including a few times on each page isn’t a bad idea if you want to promote your social accounts.
Match your site’s colors to your brand
Have you selected color or two for your brand? Even for a personal brand, you can use a logo and attach some colors to help support your message and what you stand for. Many themes include a simple color customization option in the Customizer, but if not, you can use a tool like CSS Hero to change the color of any element on your site. If you’re comfortable with writing some CSS, you can also make these customizations yourself by adding your code to the Additional CSS section in the Customizer.
Conclusion
Building a strong personal brand doesn’t have to be hard. In fact, a lot of bloggers make it unnecessarily hard by forgetting many of the steps outlined in this guide. If you follow every method included here for personalizing your site, you’re guaranteed to have a more memorable and unique website. If you have any questions about branding and customizing your WordPress blog, leave a comment below!


