Google Adsense is one of the multiple ways for website monetization, but it requires you to have a few visitors to get started.
You can add it via your WordPress website manually, or directly via a plugin. To save you from the hard work we have described the whole process.
Without further ado, let’s start with our how-to post.
Start Monetizing Your Website
Adding Adsense to your website is pretty simple. Once you have set-up your website and bought some visitors, you just need to start with your Adsense account.
Signing up to Google Adsense
In case, you don’t have an Adsense account you would first need to Sign-up to Google Adsense and create an account. Apply with website email if possible; it improves the chances of Adsense account approval.

You will get a code from Adsense team after registering the account. In order, to get your Adsense account reviewed by the team, you would need to add this code to your WordPress website. You can do it directly from WordPress or with a plugin.
Read our post on visitors boosting techniques to get your Google Adsense more easily.
Adding Adsense manually
While it is easy to add Adsense manually into the WordPress; the process is a bit complex when it comes to adding it within the content. Here are some simple steps to easily add Adsense to WordPress manually.
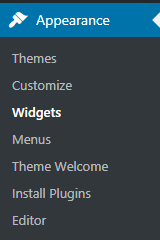
Step-1: WordPress makes it simple to add Adsense. You just need to log into the WordPress admin panel. Select the Appearance from your Dashboard and then go to Widgets.
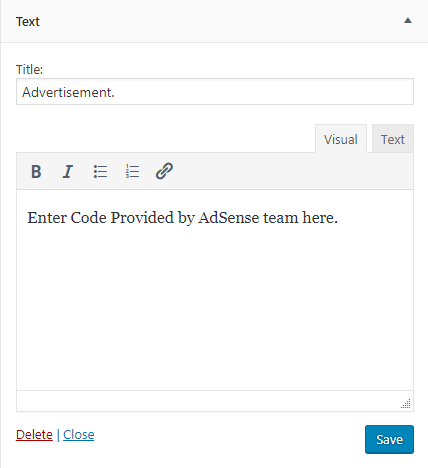
Step-2: On the Widget page, there will be a Text Widget. Add this to the sidebar. Add the Title- ‘Advertisement’, and the Adsense code, into the box as shown in the image below.
After adding the Adsense code, you will have your WordPress website reviewed by AdSense team (in case you are applying for Adsense approval) and by your visitors, of course.
Take a look at the template below, this is how your Adsense code would look like.
<script async src="//pagead2.googlesyndication.com/pagead/js/absbygoogle.js"></script>
<script>
(absbygoogle = window.adsbygoogle || []).push({
google_ad_client: "ca-pub-1127669851346260",
enable_page_level_ads: true
});
</script>
While the process is quite easy, it becomes a lot complex when it comes to adding Adsense inside the content, especially without a plugin.
Adding Adsense Inside Content
In order to edit your theme from within the WordPress dashboard, your themes files must writable. To do that you need to change the permissions, or CHMOD of the themes files to at least 666 or 777 permissions. You can also work on theme files in the hosting accounts file manager or use FTP. I prefer to edit the theme files from the dashboard.
Before you get started you should copy any file you are attempting to edit and save it in a text file on your computer. If anything goes wrong you can simply paste the unedited version back to undo any damage. You have been warned!
Starting from the top of the WordPress blogs main page, just above the post you can place your AdSense script like shown in many blogs, a graphic, banner ad, both AdSense and a banner, or anything else for that matter.
Keep in mind that Google will usually only show three AdSense blocks per page, so if you place AdSense into your WordPress theme and also in your posts and then in the sidebar, usually only the top three blocks will show. The remainder will be open space.
The place to add your code is in the main index template (index.php) and if desired can also be placed in the single post (single.php), page template (page.php), archives and if your theme has one the 404 template.
Open one of the files and place your code just above the content which looks like this:
Your Code Here

<?php if (have_posts()) : //Are there any posts? ?>
Other places to place the code are: Below the post above or below the comments would be:
<?php if ( comments_open() ) : //if comments are allowed ?>
You can experiment with many different places, just be sure to backup any file you are attempting to edit, and that the AdSense code or banner fits in the area and that all HTML or script tags are properly closed.
It would also be wise to view your changes in different browsers and different size windows to make sure it looks right.
How to Add Adsense to WordPress with Plugins
Adding Adsense manually is not complex at all; not until you want to insert the ad within the content.
That said, the whole process becomes much more dynamic and functional with Adsense plugins. You can add it anywhere on the page including the content part using Adsense plugins.
While there are many compelling, actionable WordPress plugins, Ad injection is the fastest and simplest extension. If you are a blogger, then Ad injection is your take.
1. Adding Ads using Ad injection plugin
To start using this plugin you need to open your dashboard and select add new in the plugins.
Search for Ad injection plugin and install, activate it. Once you have done this go to Settings > Ad injection. This is how it would look like-

For Beginners – You can place Ads on pages and within the post. You will see the following options in Ad injection
- Top Ad option – This would help you in adding ads just below the title of the post.
- Random Ad option – It makes the ad appear at the random place between the content based on article length.
- Bottom Ad option – Bottom ad will allow you to add it at the end of the post.
- Footer Ad option – For adding ads after the comments.
- Widget option – This option is for ads within the widget area.
- Template option – For Ads within the theme
You can disable ads based on your content needs and filter ads based on categories, authors, and tags. Also, for offering different ad-oriented-content to your visitors you can use Ad rotation feature.
If you want to change the alignment; you can do it without knowing CSS, i.e. using inbuilt options.
Once you are done with your ad needs, click on the ad test button to know how it would look like. Don’t forget to save all settings.
Alternatives for Adding Adsense to WordPress-
We have tested and listed some of the best and easiest alternative plugins for adding Adsense to WordPress.
2. AdRotate banner manager

Adrotate is one of the most popular plugins for WordPress Adsense insertion. If you are looking for a functionally dynamic plugin, then Adrotate is for you. You can test multiple ads for improving your overall performance.
UI is really simple, so you won’t have to get your sleeves dirty with coding. Adrotate is handy with all advertisement network. You can also create automated JavaScript for setting up ad-cycles.
3. Easy Plugin for Adsense

Easy Adsense makes the process of Adsense addition swift and easy. It is specifically designed for those with beginners and/or those with no coding knowledge. You can monetize your blog and content is the simplest way possible.
This plugin provides the user proper process for powerful ads management. You can create custom ads to be placed on your website. It supports widgets and you can manage and handle ads.
4. WP Simple Adsense insertion

Adding Heavy plugins can affect your site speed, and that’s where WP Simple Adsense insertion outstands.
It offers simple and quick Steps to insert Google Adsense efficiently. You can add it to your post, a page, and widgets using the shortcode.
You just need to work a bit on settings and change it according to your requirement. After this, you can start posting Ads anywhere on your website.
Over to you
Adding Adsense to your website is a pretty simple job, you just need to follow the right guide. Once you have the Adsense account, make sure to use proper Adsense management plugins.
You can add Adsense to WordPress manually from the widgets page. However, adding Adsense inside the theme would need coding knowledge. You can always use plugins to make the whole process easier and organized. There are some great extensions like WP Adsense insertion, Ad injection and easy plugin for management.
You can also add Adsense into the theme using Ad injection without any coding. However, if you are doing it without plugins, we would recommend you to use Adsense compatible themes for saving your coding work out.
If you are unsure about anything; let us know via the comment below.



2 comments
Do you believe that I need to have a large amount of access to make my Adsense registration? Or would it be more appropriate to wait for some time for a blog to sign up for Adsense? I say this because I tried to register a blog I created years ago and was disapproved …
Thank you for your attention!
Hi Antony,
Thanks for taking out the time to comment and ask a question. Here is what it seems to work.
Each blog is analyzed by Google Adsense Team before approval. They look into many of the factors like the content of the blog, traffic, age of domain, Theme, etc…
To get a sense of “Where your blog stands now” take a look at your blog with a visitors perception. If it looks useful and regularly updated, then hopefully, Adsense team will consider it.
I also recommend trying ClickRight Theme from ThemeBounce. It’s simple, elegant Theme with clean code and helps a lot in placing Adsense ads at the right spots.
Good Luck,
Jazib